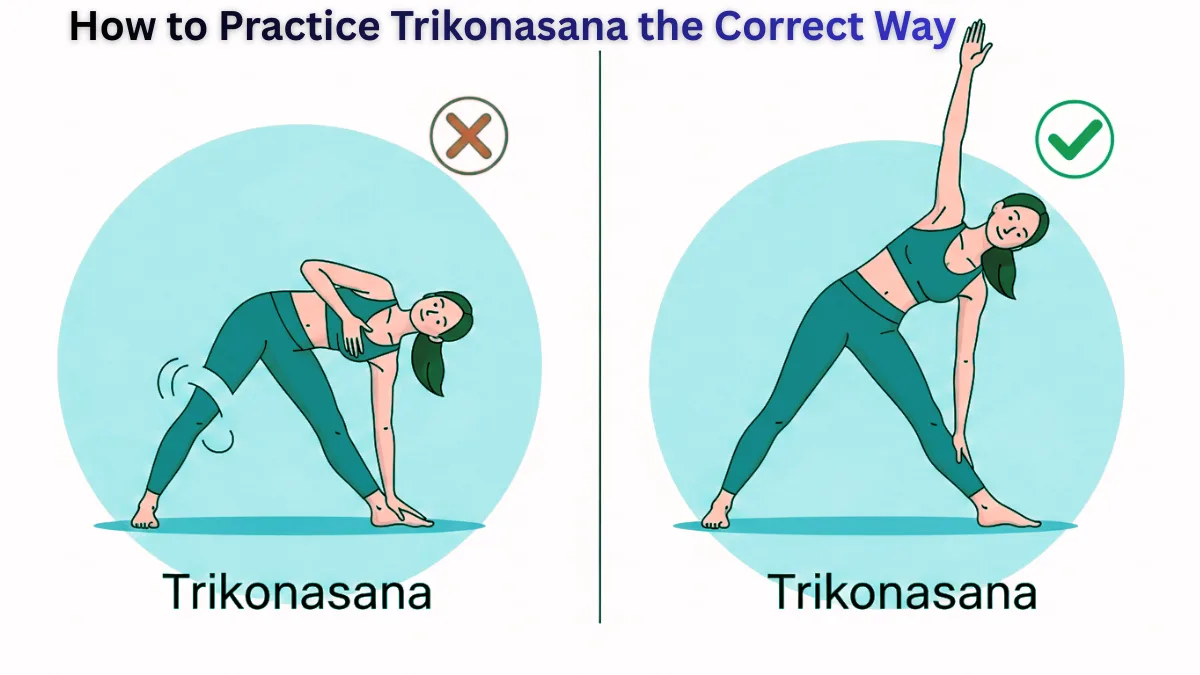

Trikonasana correct method
Trikonasana : Yoga is not just about flexibility—it’s about alignment, awareness, and balance. One of the most commonly practiced standing yoga poses, Trikonasana (Triangle Pose), looks simple but is often done incorrectly. Even small mistakes in posture can reduce benefits or cause discomfort.
you’ll learn the correct method of Trikonasana, common mistakes beginners make, and expert tips to practice it safely and effectively for maximum physical and mental benefits.
🧘♀️ What Is Trikonasana?
Trikonasana, also known as the Triangle Pose, is a classic standing yoga posture that stretches the spine, legs, hips, and chest. It improves balance, strengthens muscles, and enhances overall body coordination.
This pose is ideal for beginners and experienced practitioners—when done correctly.
❌ Common Mistakes While Doing Trikonasana
Many people unknowingly practice Trikonasana the wrong way. Here are the most frequent mistakes:
1. Bending the Knees
Trikonasana requires straight legs. Bent knees reduce stability and limit the stretch.
2. Collapsing the Chest
A closed chest restricts breathing and reduces spinal extension.
3. Looking Down Instead of Up
Turning the head downward disrupts spinal alignment and balance.
4. Uneven Arm Alignment
Arms should form a straight vertical line—misalignment strains the shoulders.
5. Forcing the Body
Overstretching to reach the foot can cause back or hip pain.
✅ Trikonasana Correct Method (Step-by-Step)
Follow these steps carefully to practice Trikonasana the right way:
Step 1: Starting Position
Stand straight with your feet about 3–4 feet apart. Turn your right foot outward and keep the left foot slightly inward.
Step 2: Arm Alignment
Stretch both arms sideways at shoulder level, palms facing down.
Step 3: Bend from the Hip
Exhale and bend sideways from your hip—not the waist—towards your right leg.
Step 4: Hand Placement
Place your right hand behind your ankle or on your shin. Do not force it to the floor.
Step 5: Upper Arm & Chest
Raise your left arm straight up. Keep your chest open and facing forward.
Step 6: Head Position
Turn your head gently and look up towards your raised hand.
Step 7: Breathing
Hold the pose for 20–30 seconds while breathing normally. Repeat on the other side.
🌟 Benefits of Practicing Trikonasana Correctly
When done with proper alignment, Trikonasana offers powerful benefits:
- Improves spinal flexibility
- Strengthens legs, knees, and ankles
- Enhances digestion and metabolism
- Opens chest and improves lung capacity
- Relieves stress and mental fatigue
- Improves balance and posture
⚠️ Precautions to Keep in Mind
- Avoid this pose if you have severe back, neck, or hip injuries
- People with low blood pressure should avoid holding the pose for long
- Pregnant women should practice under expert guidance
- Always warm up before starting
🧠 Pro Tips for Better Results
- Practice in front of a mirror for alignment awareness
- Focus on quality, not depth
- Use yoga blocks if flexibility is limited
- Keep your core engaged for better balance
- Consistency matters more than intensity
🧘♂️ Final Thoughts
Trikonasana is a powerful yoga pose—but only when practiced correctly. Instead of forcing your body, focus on alignment, breathing, and awareness. Over time, your flexibility and strength will naturally improve.
At yogamakeshealthy.com, we believe yoga should heal, not hurt. Practice mindfully, stay consistent, and let yoga transform your body and mind—one pose at a time.
#Trikonasana #YogaTips #CorrectYoga #YogaForBeginners #DailyYoga #HealthyLifestyle #YogaPractice #MindBodyHealth #FitnessTips #YogaAlignment

